

A Windows computer can make a great source for high-fidelity sound. It can stream high-resolution Master Quality Authenticated music from TIDAL, or ultra-high-resolution music from its own storage, or from your network storage. But a computer’s audio output is mediocre at best, so you will need to add a USB Digital to Analogue converter.
There are lots of fine DACs available for this job, priced from just a few tens of dollars up to many thousands. You can just plug most of them into most computers and straight away you’ll get a marked improvement in sound quality. But are you getting the best that it can deliver? My guess is that most people using DACs on their computer are getting less than perfect sound because the sound is being processed by Windows in some way before it even gets to the DAC.
So, let’s see how you can set up a DAC with Windows so that it gets bit-perfect sound from your computer. And how to confirm that it is.
Why does Windows mess with your sound?
Before we start, understand that it’s right and proper that Windows takes control over audio and sometimes plays around with it. While many of us use computers for high end audio, that’s not what they are designed for. A computer is a multipurpose device that can run many processes and programs at the same time. So, while you are playing some music, Windows might want to alert you to incoming email or some other important matter. It needs to mix that notification bell or sound into your music. What if your music is running at a different sampling rate to the notification? Not a problem: Windows just resamples all the audio to one fixed sample rate. So the notification can ring right in the middle of that aria that you had, until then, been enjoying.
Let’s stop Windows’ audio shenanigans.
For our example DAC, we’re going to use the quite remarkable Topping E30 Desktop USB DAC, pictured at the top of this page. This is seriously affordable, yet offers the kind of performance you’d expect from a unit costing ten times as much. And for music playback we’ll be using the latest version of JRiver Media Center. I’ve chosen this because it’s easier than some other player software to set up, works on Windows and MAC computers (and Linux as well), and can provide confirmation that the signal is going through to the DAC perfectly.
First, get up and running quickly
If you’re using Windows 10 version 1703 – that’s the so-called Creator’s Update from 2017 – or later, you may not need to install special drivers.
When I plugged the Topping E30 into one of my Windows computers, the computer took only a few seconds to complete installing it and it made this the default sound output device. It set a default sound output of 32 bits and 48kHz. Any audio that the computer plays, regardless of source, including music, system sounds, YouTube clips or whatever, will all be mixed together and output in that format. See the problem already? If you’re playing a CD, its native 44.1kHz sampling is being converted by Windows to 48kHz. Likewise, if you’re playing some 192kHz high resolution audio.
Yes, you can change the output to match. Here goes:
Windows settings > System > Sound > Sound Control Panel (up near the top right) > Double-click on “Speakers E30” > Advanced tab > choose output format from dropdown list

That is not something that you’re going to want to do manually every time you play a different format of song, and changing it still doesn’t stop other system sounds from being mixed into your music. Other than that, so long as the Windows volume control is set to 100%, there’s a good chance that the sound will be output bit perfect. Which is to say, the data fed to the DAC is identical to the source file. A good chance, but no guarantee.
Now, let’s make it bit perfect
To guarantee bit perfect performance – and to have the system automatically switch to the appropriate digital audio format without you having to go through that long concatenation of mouse clicks – you need music playback software that can bypass Windows standard audio systems. Somewhat perversely, those Windows systems are called “Direct Sound”. Your web browser sends all its audio to Direct Sound. So does Windows Media Player. So does iTunes.
But some music playback software lets you choose the particular audio driver from all those available. One such application is Foobar2000 which, as the name suggests, has been around for a rather long time. This is free software and it works well, but it requires a lot of setting up for some ideal performance, including installing certain optional components. The one I’m going with is JRiver Media Center, now up to version 27. It also has been around for a long time. It costs around $US60 for a Windows, Mac or Linux licence, or a $US80 for a “Master” licence which works on all three operating systems. A single licence can be used, “for all your computers, within reason.” You can try it out for thirty days to see whether you want to commit.
Let’s get bit perfect. (If you’re using a version of Windows prior to Windows 10 version 1703, you’ll need drivers, which we cover further down.)
Step by step
- Download and install JRiver Media Centre in the usual way.
- Plug your DAC into one of the USB ports on your computer. Power up the DAC. If this is the first time you’ve used the DAC with that computer, wait until Windows shows a message saying that the device has been installed.
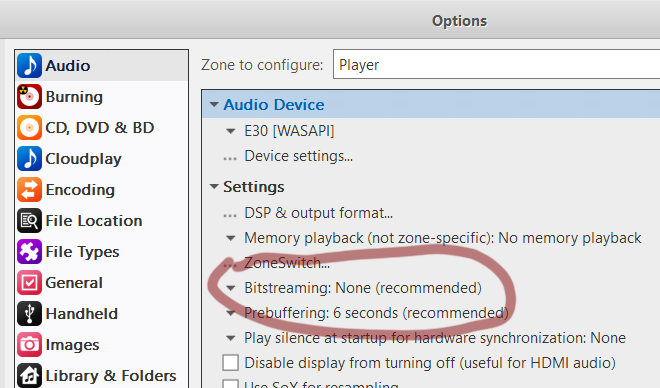
- Start JRiver. When it has finished loading, press Control-O for Options (it’s also on the Tools menu).

- There are a long list of options, but the one we want to start with is right at the top: Audio Device in the right-hand panel. There’s a good chance that it will say “Default Audio Device [Direct Sound]”. That’s the standard Windows sound channel, which is what we want to get away from. Click the down arrow next to that.

- The list will show the audio output devices available on your system, with the currently selected one ticked. Look through the list for something like the name of your DAC. In the case of the Topping E30, it’s just listed as “E30”. If it appears more than once, choose the one which has [WASAPI] after it. WASAPI stands for “Windows Audio Session Application Programming Interface”, and it’s a way for the player software to communicate with the driver of your DAC more directly than via the main body of Windows. It skips the Windows volume control, sending the digital audio stream directly to the DAC without any conversion. It also allows the player to take exclusive control of the audio device so that no other sounds are mixed in.
What about DSD?
- There’s one more important setting. If you play back DSD at this point, JRiver will convert it to PCM and then send that to the DAC. If your DAC can decode DSD itself, then go down to the Bitstreaming option under the “Settings” heading and tick DSD in the dropdown list.

- Click OK. And now you’re ready to play some music bit-perfect. JRiver has lots of options, but for now, just click on Player in Playing Now at top left and drag some music from your music folder into the main player window, then double click on a track.
How do you know that the settings are right?
You should take a moment to confirm that the music really is being delivered in bit perfect format to your DAC. I have a strong preference for a DAC which has a readout that shows what format is being received. A glance at the screen will confirm that it’s working correctly. Here the Topping E30 is decoding DSD256 (the per-channel bitrate of DSD256 is 11.288MHz):

But some DACs don’t display this information. No matter, JRiver can confirm this for you. At the top of the main window you’ll see a small cog to the right of the track progress bar. If it’s grey while music is playing, then the audio is not being delivered directly to your DAC but is being processed in some way. If it’s blue, the connection is direct.

Hover your mouse cursor over the cog and a box will open. If it says “Audio Path: Direct” near the top, the connection is direct. Otherwise it will have nothing immediately after “Audio Path”.

DoP or DSD?
By the way, you’ll see in that box that the input and output signals are “DoP DSD64”. “DoP” stands for DSD over PCM. Because DSD wasn’t really supported by USB Audio standards, many DSD-capable DACs use a workaround in which the DSD signal is packaged inside a container than looks to USB like PCM. Note, it isn’t converted to PCM, just disguised to look like it. The DAC recognises the DSD lurking underneath the disguise, extracts it and then decodes it as native DSD.
In more recent times, especially using the drivers we’ll examine shortly, native DSD transport has become more common. This has the advantage of lower bitrates than DoP format. The highest DSD capable of being transported via DoP is DSD256. For DSD512 you need native DSD.
What, you don’t have any DSD tracks to test?
Not to worry, the Norwegian record label 2L has a good selection of tracks in different high-resolution formats, including PCM up to 352.8kHz, MQA and DSD256, along with some surround formats, available for you to download for free for testing purposes.
When the Windows drivers aren’t good enough
The Topping E30 is a USB Audio Class 2.0 device. You can tell because it supports sampling rates of greater than 96kHz. Indeed, much, much greater.
The built-in Windows 10 USB Audio Class 2.0 driver tops out at 32 bits and 384kHz sampling, and DSD256. They’re astonishingly high resolutions, of course, but the Topping E30 can go even higher to 768kHz sampling and DSD512. For that you need its drivers.
Some DACs come with the manufacturer’s drivers on a CD, but generally you have to download them from the manufacturer’s website. Even if they’re on an included CD, it’s usually a good idea to download them afresh to ensure that you have the latest version. (As I’m writing this, I see that new drivers for the Topping E30 were released just four weeks ago.) Sometimes the drivers can be downloaded direct from the specific product page. Other times you should look for Downloads or Support on the website.
Disconnect your DAC, then install the drivers as you would any other bit of software.
Change to ASIO
When its finished, plug the DAC back in again. Chances are it will now have a slightly different name. Using the standard Windows driver my DAC was called “Speakers E30”, and with the new drivers it was called “Speakers TOPPING USB DAC”.
Now, start up JRiver again, go to the options (Control-O) and choose your DAC’s name, but this time with [ASIO] after it.
This has nothing to do with Australia’s security services. In this context, ASIO stands for “Audio Stream Input/Output”. It’s a digital audio protocol developed many years ago by professional audio equipment maker Steinberg. It provides an even more direct connection between your player software and the DAC than WASAPI. It is also low latency – there’s less delay in the signal – than the alternative, although this is more important for pro audio than in the home.
Having done that, try playing some music again. With the Topping E30, you can now play DSD512 (DSD at 22.576Mbps per channel, aka 8x DSD). The picture at the top of the page shows the DAC decoding DSD512.
Doing DSD to the max
ASIO doesn’t increase the maximum amount of data that can pass through a USB connection. But it does allow JRiver to send DSD as a native bitstream instead of it being hidden in a PCM-like stream. That saves space, so it works. When I switched to ASIO, JRiver started sending DSD in that native bitstream rather than in DoP format:

But many DACs do not support native DSD. If you do install ASIO and DSD stops working for you, you will need to change one more setting in JRiver.
Again, Control-O. Go to Device Settings, the second item from the top. In the new box that opens, you’ll see a tick box towards the bottom right, labelled “DSD bitstream in DoP format”. If it’s unticked, then the DSD is being sent natively. Try ticking it. The DSD music should now flow.

Right to go
You should now be getting every bit of quality out of your DAC that it’s capable of delivering. Happy listening!


